Protecting Your Mac with Internet Security
Watch tutorial on Internet Security
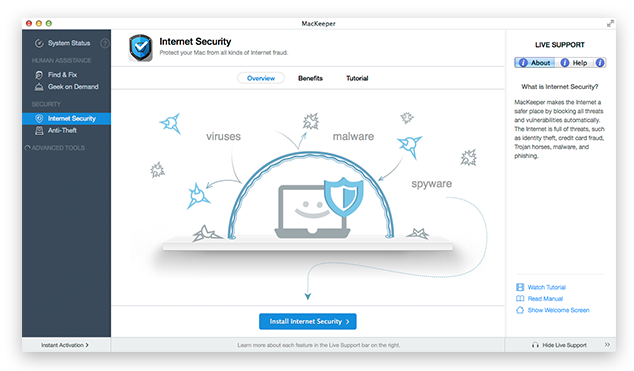
The Internet Security plugin that is built into MacKeeper helps protect your Mac from different kinds of online threats – identity theft, credit card fraud, malware, phishing etc. It includes two main modules – Real-Time Safe Browsing and Antivirus.
To use Internet Security, install it from the Internet Security page.
Important
You cannot install Internet Security if you already have another antivirus with real-time protection. All additional Internet Security files need 150 MB of free space.
 Installing Internet Security from the Internet Security page
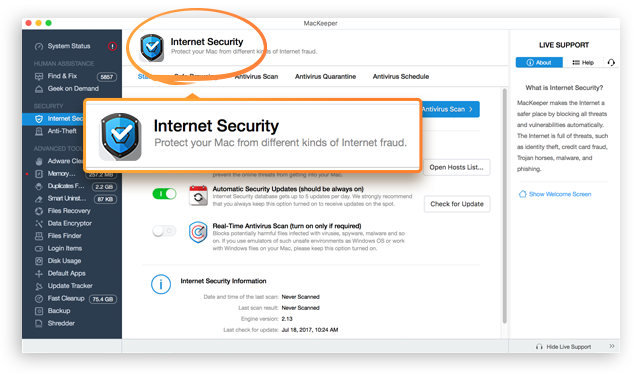
To open Internet Security, click its name on the navigation bar. The Internet Security page is divided into five tabs: Status, Real-Time Safe Browsing, Antivirus Scan, Antivirus Schedule, and Antivirus Quarantine.
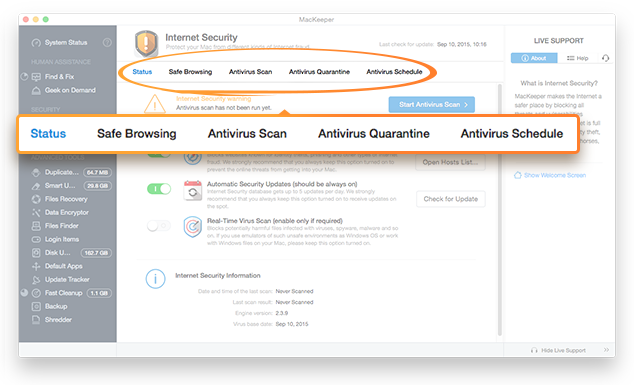 Internet Security tabs
Status
How to use the Status page of Internet Security?
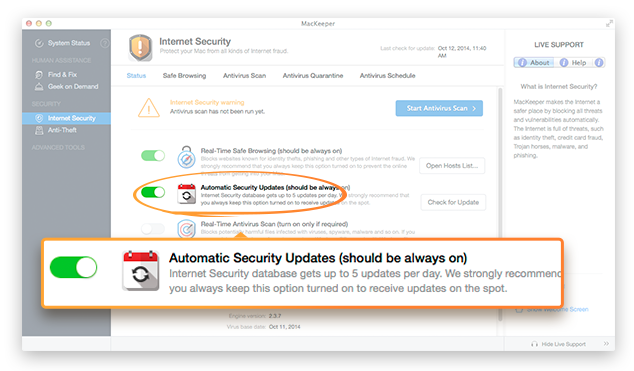
This page contains information about the current state of Internet Security. Here you can do the following:
-
Activate or deactivate Real-Time Safe Browsing, Automatic Security Updates and Real-Time Antivirus Scan.
-
Check updates of virus databases.
-
Open the Real-Time Safe Browsing page by clicking Open Hosts List.
 Internet Security. Status tab
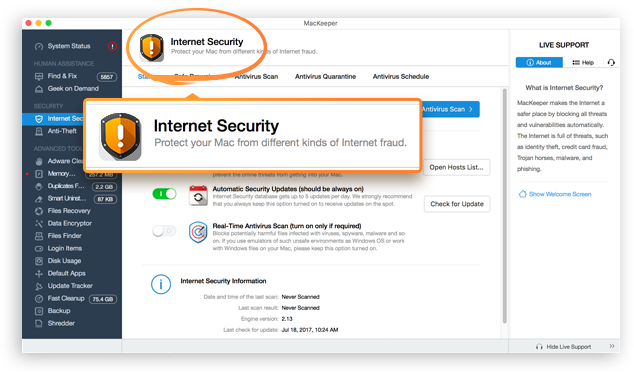
Internet Security has the following statuses:
-
Antivirus scan has not been run yet (yellow status icon).
 Internet Security. Antivirus scan has not been run yet
-
Internet Security has found infected files that are not quarantined (red status icon).
 Internet Security. Infected Files
-
Internet Security is operating normally (blue status icon).
 Internet Security is operating normally
-
Your virus definitions may be out of date, please check for updates (orange status icon).
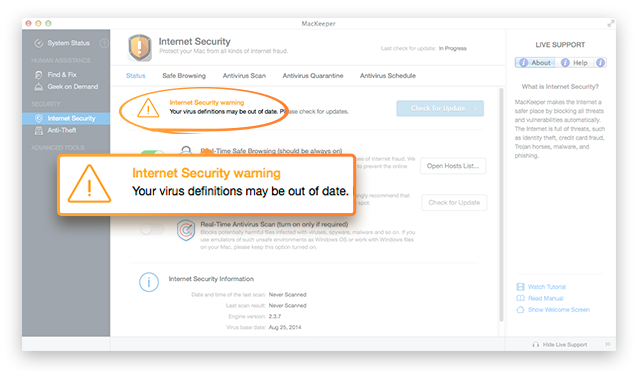 Internet Security. Virus Definitions
Real-Time Safe Browsing
How to use Real-Time Safe Browsing?
Real-Time Safe Browsing protects you from entering potentially dangerous websites. It blocks such websites even before you open them. You can manually add such blocked websites to the blacklist on the Real-Time Safe Browsing pane by clicking Blacklist, Add Host. Besides, you can add the trusted websites to the whitelist.
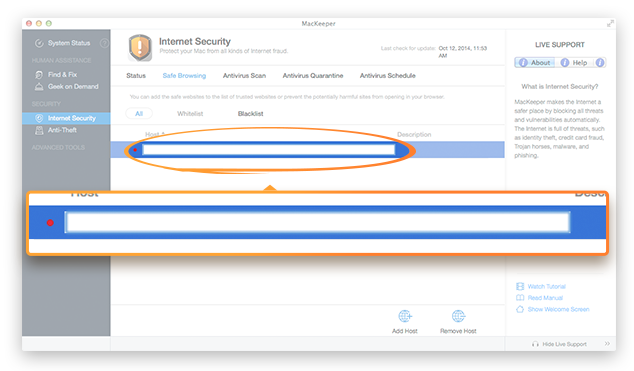 Real-Time Safe Browsing. Adding Websites to the Blacklist
Antivirus Scan
How to scan your system with the MacKeeper antivirus?
On this page you can start either a full or a custom system scan for viruses:
-
To start a full system scan, click Start Antivirus Scan, and the antivirus will scan all files and folders on your disk, one by one.
Note
Full system scan includes the following folders: User, System, Library, and Applications.
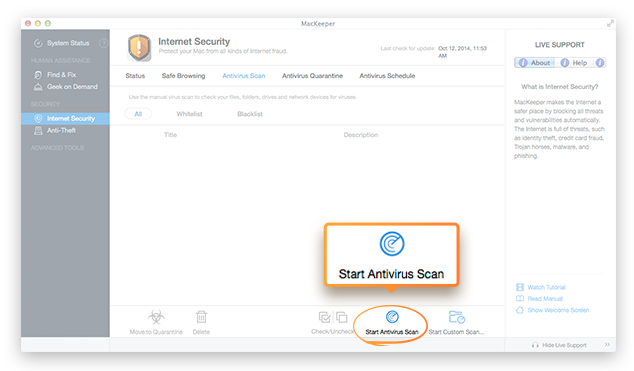 To start a full system scan, click Start Antivirus Scan
-
To interrupt the scan, click Stop Scan.
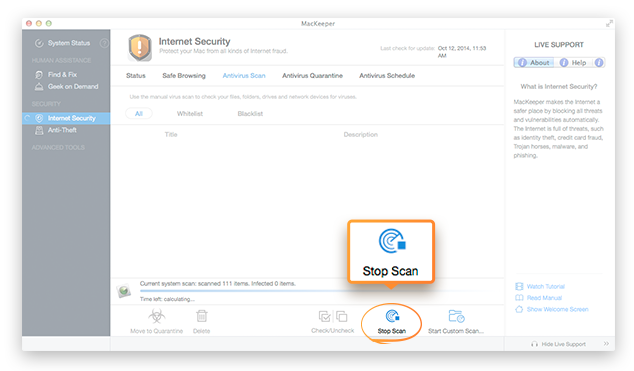 To interrupt the scan, click Stop Scan
-
To scan a specific folder, click Start Custom Scan, select a folder that should be scanned, and then click Open. The scan starts automatically.
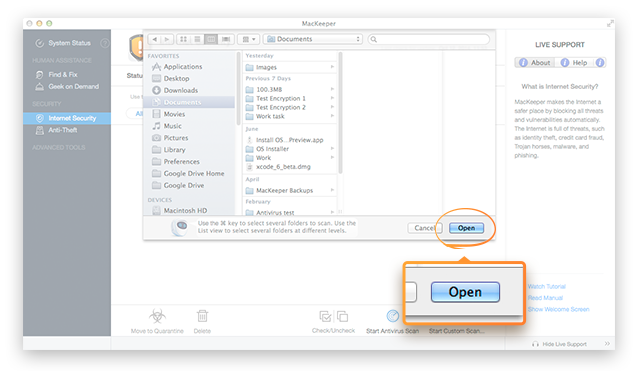 To scan a specific folder, click Start Custom Scan
-
To interrupt the custom scan, click Stop Custom Scan.
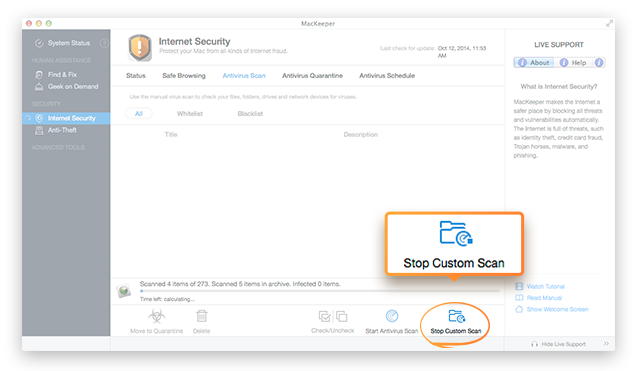 To interrupt the custom scan, click Stop Custom Scan
If the antivirus finds any infected files, you can either move them to the quarantine or delete them by clicking the appropriate buttons. The found items are not selected by default. Use the checkboxes or the Check/Uncheck buttons to select the items that you want to move to quarantine or delete.
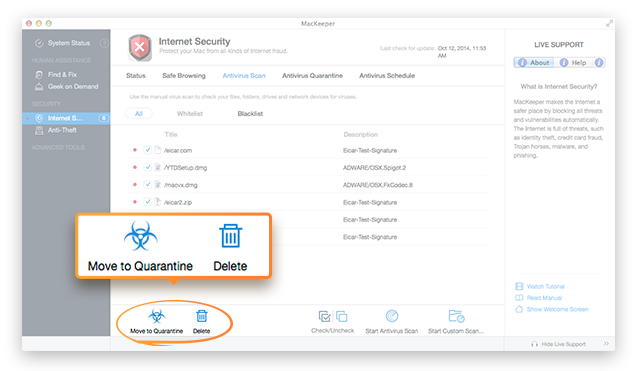 You can quarantine or delete the found viruses
Antivirus Schedule
How to schedule system scans with the MacKeeper antivirus?
This pane contains information about the last scheduled scans and a list of scheduled items. To schedule antivirus scan for a specific folder, do the following:
-
Click Add.
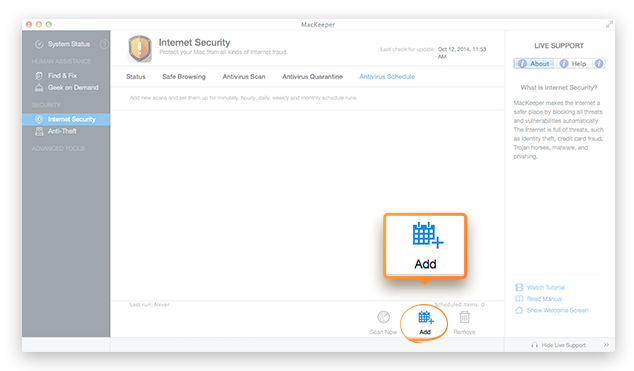 Add items that should be scheduled
-
Select a folder for which you want to create a schedule, and then click Open.
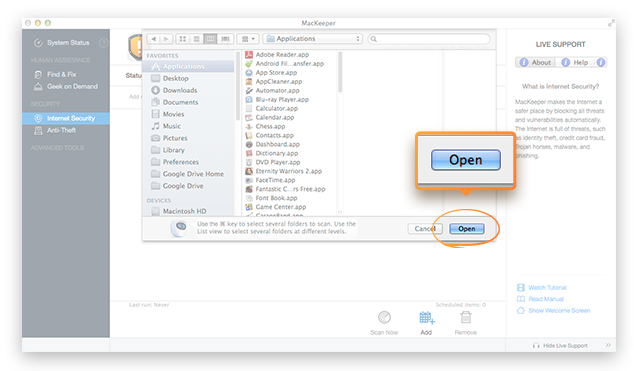 Select a folder for which you want to create a schedule
-
The following scheduling options are available:
-
Manual (by default)
 Antivirus Schedule. Manual Scheduling Option
-
Minutely: This scheduling option uses a minute as a minimum time unit. Enter a number from 1 to 59 in the Every… minute(s) field to indicate the intervals of automatic scan.
-
The system informs you about the date and time of the next antivirus scan/antivirus schedule scan under the Next fire headline.
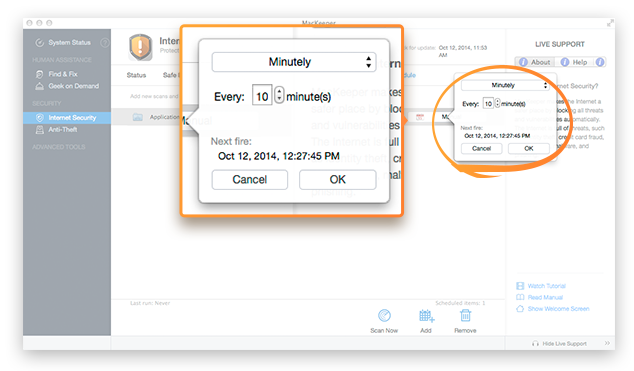 Antivirus Schedule. Minutely Scheduling Option
-
Hourly: This scheduling option uses an hour as a minimum time unit. Enter a number from 1 to 23 in the Every… hour(s) field to indicate the intervals of automatic scan. You can also specify the number of minutes past the hour. But it does NOT mean that the scan will take place every hour plus specific amount of minutes. It just enables you to shift the hourly time interval. For example, let's fill in the fields with the following values:
-
Every 3 hour(s)
-
At 15 past the hour
As a result, the next automatic scan will take place every three hours and fifteen minutes past the hour. For example, at 3-15, 6-15, 9-15 and so on. (NOT at 3-15, 6-30, 9-45 and so on).
The system informs you about the next scan date and time under the Next fire headline.
Important
When you schedule a scan for the first time, the first automatic scan will take place at the default time – in one hour starting from the schedule time – and after that it will be based on your custom schedule.
Click OK to save the changes.
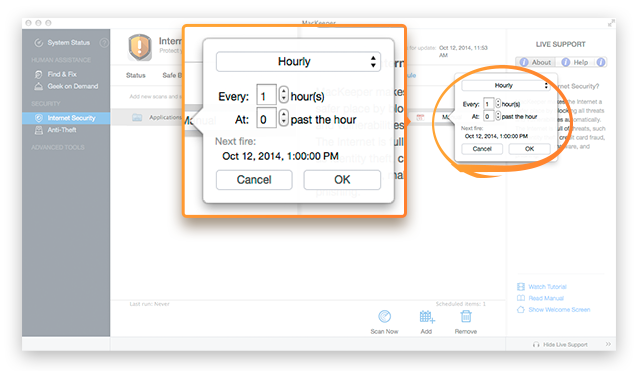 Antivirus Schedule. Hourly Scheduling Option
-
Daily: This scheduling option uses a day as a minimum time unit. Enter a number from 1 to 30 in the Every… day(s) field to indicate the intervals of automatic scan, and specify the scan time.
The system informs you about the date and time of the next antivirus scan/antivirus schedule scan under the Next fire headline.
Important
When you schedule the scan for the first time, the first automatic scan will take place at the default time – the next day starting from the schedule time – and after that it will be based on your custom schedule.
Click OK to save the changes.
 Antivirus Schedule. Daily Scheduling Option
-
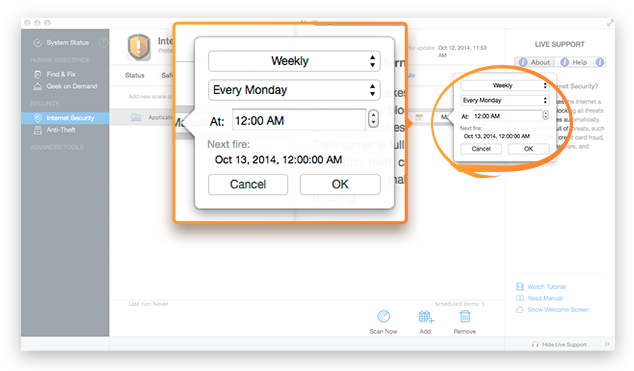
Weekly: This scheduling option uses a week as a minimum time unit. Select a weekday on which you want the scan to take place, and specify the scan time.
The system informs you about the next scan date and time under the Next fire headline. Click OK to save the changes.
 Antivirus Schedule. Weekly
-
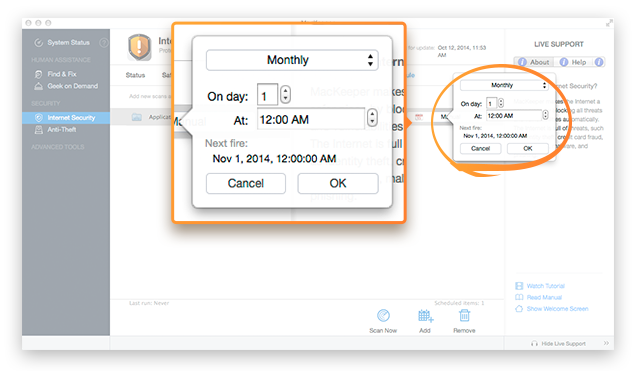
Monthly: This scheduling option uses a month as a minimum time unit. Specify the day of the month (from 1 to 31) on which you want the scan to take place, and specify the scan time.
The system informs you about the date and time of the next antivirus scan/antivirus schedule scan under the Next fire headline. Click OK to save the changes.
 Antivirus Schedule. Monthly Scheduling Option
To run a scan at the current time, click Scan Now. To stop scheduling, select the scheduled item, and then click Remove.
Antivirus Quarantine
How to quarantine viruses with the MacKeeper antivirus?
Antivirus quarantine is designed for infected items that contain important information and therefore cannot be deleted. When an item is quarantined, it is put to the/Library/Application Support/MacKeeper/Quarantine folder. It means that the viruses are removed from the system, but the files remain and can be restored from the quarantine.
On the Antivirus Quarantine pane you can view a list of all quarantined items, each of which you can restore from the quarantine or delete. Besides, you can view information about the total number of quarantined items, including individual information for viruses, trojans, and other malware. The items are not selected by default. Use the checkboxes or the Check/Uncheck buttons to select the items that you want to restore from quarantine or delete. To restore the items from the quarantine, click Restore from Quarantine. To remove the items, click Delete.
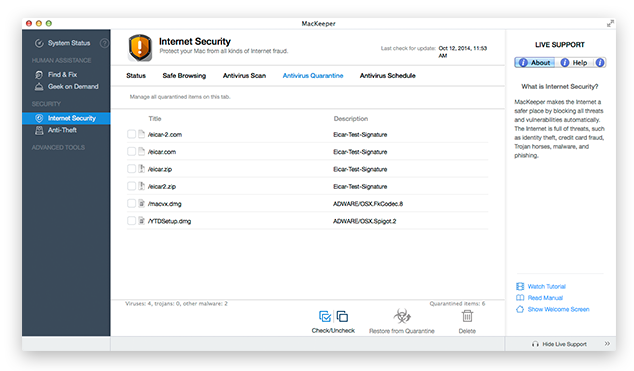 Internet Security. Antivirus Quarantine
MacKeeper Menu in the Menu Bar
How to access Internet Security from the MacKeeper menu in the menu bar?
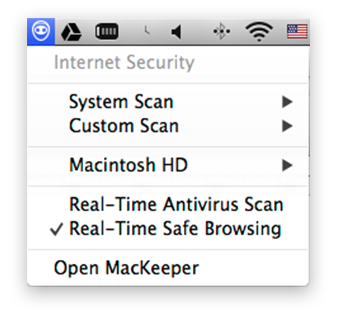
You can access Internet Security from the menu bar. To open it, click the MacKeeper icon in the menu bar.
 MacKeeper Menu in the Menu Bar
The following commands are available:
-
System Scan > Scan Now: Run a full system scan.
-
System Scan > Open Reports: View the Logs window with information about all actions that were performed by Internet Security on this Mac.
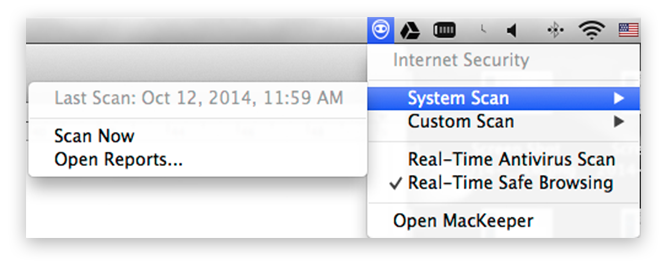 MacKeeper Menu in the Menu Bar. System Scan
-
Custom Scan > Start New Scan: Run a custom scan.
-
Custom Scan > Open Reports: View the Logs window with information about all actions that were performed by Internet Security on this Mac.
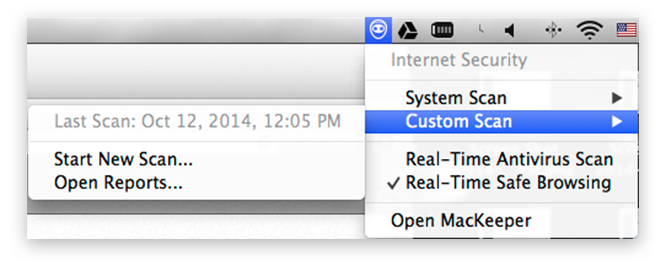 MacKeeper Menu in the Menu Bar. Custom Scan
If you have scheduled any specific folder or drive for an antivirus scan, it will also be displayed in MacKeeper Menu with following options:
-
[Scheduled Item Name] > Scan Now: Scan the scheduled items.
-
[Scheduled Item Name] > Manage This Task: If the MacKeeper window is not opened, click this command to open it on the Antivirus Schedule pane.
-
[Scheduled Item Name] > Open Reports: View the Logs window with information about all actions that were performed by Internet Security on this Mac.
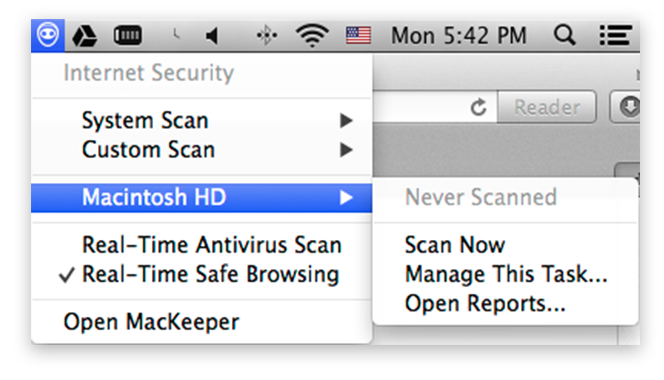 MacKeeper Menu in the Menu Bar. Managing Scheduled Items
-
Real-Time Protection: Manage options of the real-time protection.
-
Open MacKeeper: Open the MacKeeper window if it is not opened yet.
 MacKeeper Menu in the Menu Bar. Real-Time Protection, Open MacKeeper